
Why a Hand-Held Vacuum is Your New Best Friend for PC Cleaning
So, you've noticed your computer is starting to sound like a jet engine taking off, or maybe it's running hotter than a summer's day in Brighton. Dust build-up is often the culprit, and while many tech enthusiasts reach for a can of compressed air, there's a brilliant alternative that's both eco-friendly and effective: a small hand-held vacuum cleaner. If you're wondering how to clean dust from a PC without compressed air, you're in the right place! Not only is this method kinder to the environment (no nasty chemicals or disposable cans), but it's also super convenient and often cheaper in the long run. Let's dive into how you can keep your rig spick and span with this handy tool.
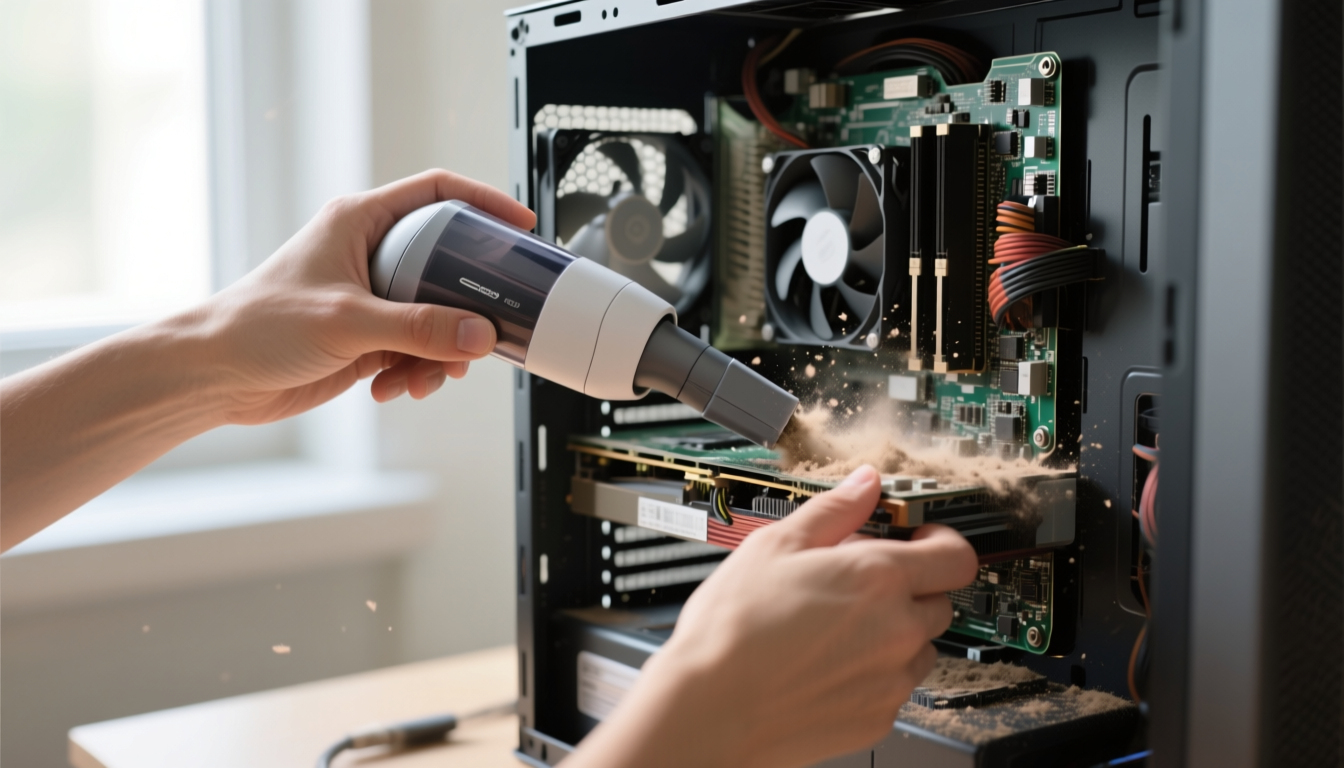
Gearing Up: What You'll Need
Before you start, make sure you have the right kit. First, grab your small hand-held vacuum – ideally one with a crevice tool or a narrow nozzle attachment to get into those tight spaces. You'll also need a soft-bristled brush (an old paintbrush or makeup brush works a treat), a Phillips head screwdriver to open your case, and optionally, some anti-static wrist straps if you're feeling extra cautious. Oh, and don't forget to power down your PC completely and unplug it from the wall! Safety first, always.
Step-by-Step: How to Clean Your PC with a Hand-Held Vacuum
Ready to get stuck in? Follow these simple steps for a dust-free machine.
Step 1: Open Up Your PC Case
Carefully remove the side panel(s) of your PC case. Most modern cases have thumbscrews, so you might not even need a screwdriver. Place the panel somewhere safe where it won't get scratched.
Step 2: Initial Brush-Off
Use your soft-bristled brush to gently loosen dust from components like the motherboard, GPU, and RAM. Be delicate – no need to go at it like you're scrubbing a pan! This helps dislodge dust so the vacuum can suck it up more effectively.
Step 3: Vacuum Time – The Right Way
Attach the crevice tool to your hand-held vacuum and set it to a low or medium suction setting if possible (you don't want to yank any small components). Hold the nozzle about an inch away from the components and slowly move it across surfaces, focusing on areas with heavy dust build-up like fans, heatsinks, and filters. Avoid touching the components directly with the vacuum to prevent static discharge or physical damage.
Step 4: Pay Special Attention to Fans and Vents
Fans are dust magnets! Hold the fan blades still with your finger (gently!) while vacuuming around them to prevent spinning, which could generate static electricity. Clean the case vents and any dust filters too – these are key for maintaining good airflow.
Step 5: Final Check and Reassembly
Once you've vacuumed all visible dust, give the interior a once-over with your brush again if needed. Ensure no cables have been dislodged, then carefully reattach the side panel. Plug everything back in, power up, and enjoy your quieter, cooler PC!
Tips for Success and What to Avoid
To make sure your cleaning session is a triumph, keep these pointers in mind. Always work in a well-lit area so you can see what you're doing. Avoid using the vacuum on high suction near small, loose parts like jumpers or cables. Never vacuum while the PC is powered on or plugged in. If your hand-held vacuum has a metal nozzle, consider wrapping the end in anti-static material or using a plastic attachment to reduce static risks. And remember, if you're ever unsure, there's no shame in consulting a professional!
Wrapping Up: Breathe Easy, PC!
And there you have it – a comprehensive guide on how to clean dust from a PC without compressed air using a hand-held vacuum. Not only have you saved a few quid and helped the planet, but you've also given your computer a new lease on life. Regular cleaning every 3-6 months can prevent overheating, reduce noise, and extend the lifespan of your components. So next time your PC starts coughing up dust bunnies, you'll know exactly what to do. Happy cleaning!