
Introduction
Hello there, MacBook enthusiasts! If your trusty laptop has been sounding more like a jet engine than a sleek computing device, it might be time to give its fan a little TLC. Overheating can slow down performance and even cause damage over time, but fear not – learning how to clean MacBook fan to prevent overheating is simpler than you might think. This step-by-step guide is tailored for beginners, so grab your toolkit (and maybe a cuppa), and let’s get started on keeping your MacBook cool, quiet, and running smoothly.
Why Cleaning Your MacBook Fan Is Important
Your MacBook’s fan is its built-in cooling system, working hard to dissipate heat generated by the processor and other components. Over time, dust, pet hair, and debris can clog the fan and vents, reducing airflow and causing your Mac to overheat. Symptoms include loud fan noise, sluggish performance, unexpected shutdowns, or even a too-warm-to-touch underside. Regularly cleaning the fan not only prevents these issues but also extends your MacBook’s lifespan. Think of it as a spa day for your laptop – it deserves it!
What You'll Need
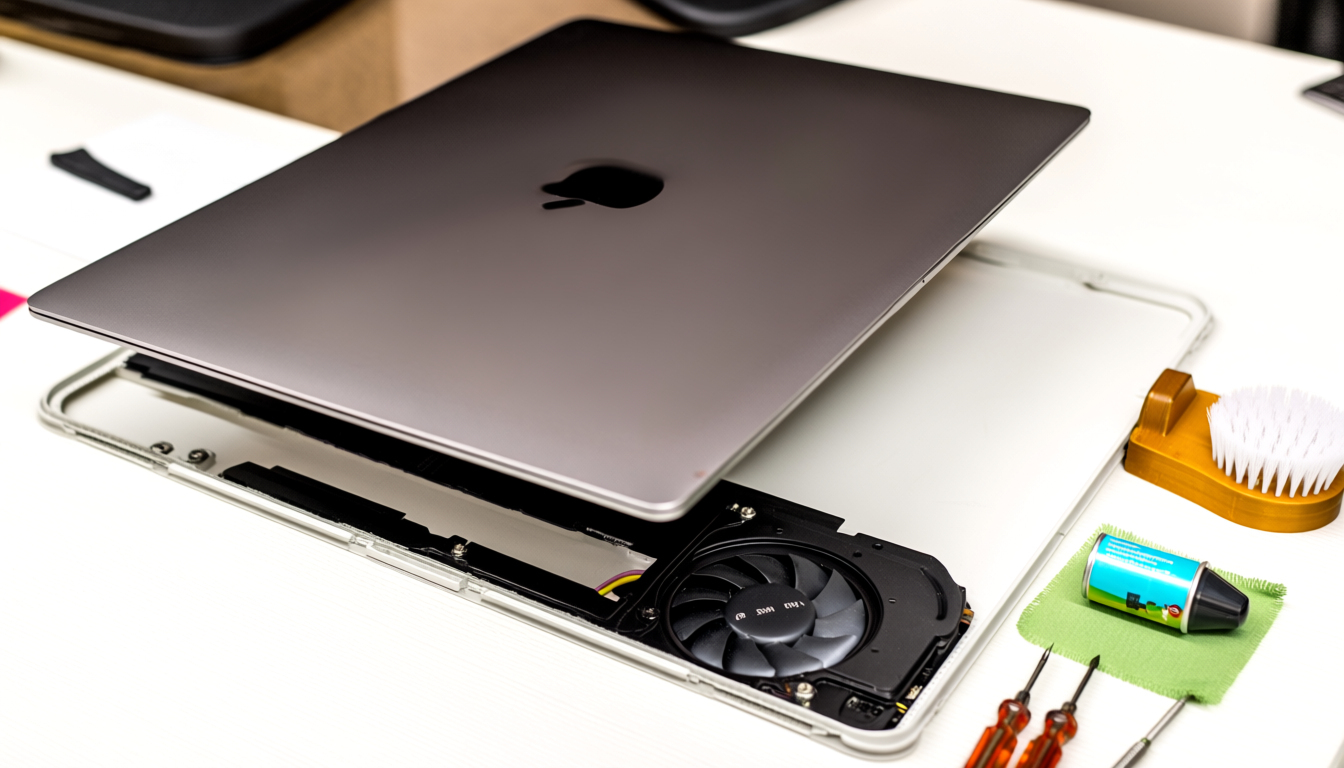
Before we dive in, gather these tools (all easily found online or in tech stores): a set of precision screwdrivers (like P5 Pentalobe and Phillips #00), compressed air canister, soft-bristled brush (anti-static if possible), lint-free cloth, and a clean, static-free workspace. Optional but handy: a prying tool or spudger for opening the case gently. Always ensure your MacBook is powered off and unplugged before starting!
Step 1: Prepare Your Workspace and MacBook
First things first – safety! Choose a well-lit, clutter-free area to avoid losing tiny screws. Ground yourself by touching a metal object to prevent static discharge, which can harm internal components. Shut down your MacBook completely, disconnect all cables, and let it cool down if it’s been in use. For extra precaution, you might want to wear an anti-static wrist strap, but it’s not essential for this task.
Step 2: Open the Bottom Case
Time to peek inside! Place your MacBook upside down on a soft surface. Using the P5 Pentalobe screwdriver, carefully remove the bottom case screws. Keep them in a labelled container or magnetic mat – they’re small and easy to mix up! Gently lift the case; if it feels stuck, use a prying tool to avoid bending anything. Voilà – you’re in! Take a moment to admire the internals, but avoid touching components directly.
Step 3: Locate and Inspect the Fan
Now, spot the fan – it’s usually near the hinge area, with blades visible. You might see dust bunnies having a party in there! Note how the fan is positioned and check for any obvious obstructions. If your model has multiple fans (like some MacBook Pros), identify all of them. This is a good time to visually inspect for any damage, but don’t worry – we’re just cleaning, not performing surgery.
Step 4: Clean the Fan with Compressed Air
Here’s the fun part: blasting away the grime! Hold the compressed air can upright and use short, controlled bursts to blow dust out of the fan blades and surrounding areas. Aim the nozzle at a slight angle to avoid spinning the fan too rapidly (which could damage it). If stubborn dirt remains, gently use the soft-bristled brush to loosen it, then follow up with more air. Avoid vacuum cleaners, as they can create static electricity.
Step 5: Reassemble Your MacBook
Once the fan looks spick and span, it’s time to put everything back. Carefully lower the bottom case onto the MacBook, ensuring it aligns properly. Screw in all the screws snugly but don’t overtighten – they should be firm but not forced. Power on your MacBook and listen: if all went well, it should boot up quietly. Run a quick test by opening a few apps to see if the fan behaviour has improved.
Tips for Maintaining a Clean Fan
To keep overheating at bay, make fan cleaning a regular habit – aim for every 6-12 months, depending on your environment. Use your MacBook on hard, flat surfaces to improve airflow, and avoid blocking the vents. Consider monitoring temperatures with apps like iStat Menus. And remember, if you’re ever unsure or your MacBook is under warranty, consult a professional to avoid voiding coverage.
Conclusion
And there you have it – a cleaner, happier MacBook fan! By following this guide on how to clean MacBook fan to prevent overheating, you’ve taken a proactive step toward better performance and longevity. Regular maintenance might seem daunting at first, but with practice, it becomes second nature. Your MacBook will thank you with whisper-quiet operation and reliable service. Happy computing, and keep cool!